It’s time for another Traktip!
Organizing your issues sometimes goes beyond things like issue type or subtype. If you have multiple projects as part of your workload, being able to associate them together within Issuetrak for reporting purposes has never been easier.
The Basics of Projects
Projects in Issuetrak are essentially an ID and a project name. You can also use an optional project category for even more granular reporting. That ID and name appear on each issue record.
Within the Projects menu, for each project, you can assign a manager, members, estimated hours and dollars, and actual hours and dollars. You can even have the actual hours roll up from any labor hours added to any issues tied to that project.
If you have another term than project, you can also rename them to better suit your terms!
To activate the Projects Feature, a user with the “Sys Admin” parameter does the following:
- Click the gear icon in the upper right > click Features beneath System.
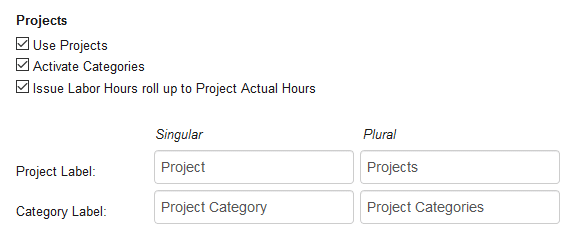
- Select Use Projects.
- If you intend to group projects into categories, select Activate Categories.
- If you want Actual Hours on Projects automatically calculated based on Labor Hours added to Project-related issues, select Issue Labor Hours roll up to Project Actual Hours.
- If you want to use your own terminology for the menu option and fields related to Projects, enter it in the Project Label fields.
- If you activated Project Categories and want to use your own terminology for the menu option and fields related to these categories, enter it in the Category Label fields.
- Click Update from the top or bottom of the screen.
You’ll get a display message that your settings have been updated. From there, you can navigate to Projects via the left menu and begin to use your projects!
Creating Projects
Projects can be created either within the project menu, or directly from an issue. Any user with the permission to access the Projects menu, and the “Can access and maintain all Projects” permission can create and modify project details.
To create a project from an issue:
- From either the submit or edit issue screen, scroll to the project field
- Click “Add” to the right of the field
- Input your desired Project Code, Title, Description (optional), and Organization
- Click “Save”
Your project details will be associated to the issue once you update the issue.
To create a project from the Projects menu:
- In the left menu, click Projects and then click List beneath the Project section in the right quick menu.
- Enter your new Project’s details.
- Click Save.
You will get a message saying your project was added. There are considerably more fields available creating the issue from the Projects menu, but being able to do the quick add from an issue is a great way to get a placeholder created. You can then edit the project to fill out additional information, and associate members to the project.
See: Help Center "About Projects" article
Once your project is associated to issues, you can then report on that information from either the issue searches or Report Writer.
As always, if you have any questions or would like to see this in action via a quick demo, don't hesitate to contact your Account Manager. We're happy to help!

Topics from this blog: Traktips
Back